Merry Christmas!
Showing posts with label Nail Art. Show all posts
Thursday, December 20, 2012
Christmas Nails
This year for Christmas I chose to do the Santa belt idea, similar to this one that I did last year. I paired it with green for a simple holiday look!
Wednesday, December 5, 2012
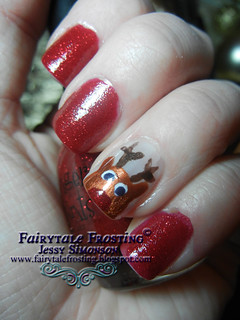
Rudolph Manicure
I was cruising Pinterest (surprise, I know) and saw this great idea from Blanket Print Nails for some festive nail art. I had to try it myself!
I didnt use all of the colors mentioned, I used what I had at home already, but there are some great instructions on their site if you wanted to try this for yourself!
Thursday, October 25, 2012
Jack Skellington Nails
Halloween might not be until next week, but you know the parties begin this weekend! I was reminiscing about my Jack Skellington Pops the other day and came across this pin with nail art I had to try for myself! Check it out!
Since I'm right handed, there was no way I was recreating that look using my left hand (LOL!) so I did a more simplified Halloween nail art design....
Have you decided on your Halloween costume yet?
Since I'm right handed, there was no way I was recreating that look using my left hand (LOL!) so I did a more simplified Halloween nail art design....
Have you decided on your Halloween costume yet?
Monday, August 27, 2012
Sparkle French Manicure
Last week on Instagram, my friend Danielle posted a photo of her manicure. She had a glittered french tip and her ring finger all pink glitter. I fell in love with it, and had to try it for myself. One of my all time favorite polishes is China Glaze "He's Going in Circles" so I chose to do that color with NYC Sheer French Manicure #147A "Kisses" as the base.
I know I say this a lot, but this may be my favorite manicure yet! Thanks for the inspiration Danielle!
Wednesday, August 22, 2012
Pink and White Chevron Nail Art
The Chevron pattern has been so trendy this year, I had to try it out on my nails. Its summer, so I chose a bold bright pink to test this out.
To create this look, I took a pair of decorative scissors, and cut strips of blue painters tape. I had polished my nail pink, once dry, I put the tape strips on and painted over with white. Remove the tape and viola! Chevron stripes! For added fun, I also did the french tip on the other nails. A fun and whimsical summer manicure!Monday, July 23, 2012
Black, Yellow and White Nail Art
My girlfriend Kelly recently celebrated a birthday. Its sort of become a new tradition for us to score a Groupon or Living Social deal and go out for a fancy dinner. This year we picked up a deal for The Melting Pot, fondue restaurant. We got all dressed up and headed to downtown Minneapolis. We were a bit early for our reservation so we went across the street to the historic Foshay Tower, which is now a W Hotel. The Foshay Tower has an observation deck on the 30th floor that has sweeping views of Minneapolis. We managed to score free entry to the deck just in time for sunset over the city. Following that, our "fondue date night" was excellent!
For an occasion like this, I couldn't just have boring blah nails, so I created this simple design to match the colors of the dress I was wearing.
For this look I polished my nails yellow. I let that coat dry, then held my black polish brush at an angle to create the two-toned look. I completed it with white polish and a toothpick to make the dots.
Here we are together on the observation deck:
And here is one of my favorite photos of the city, the reflection in the building just adds something special to it, in my opinion anyway!
Tuesday, July 3, 2012
4th of July Nails
Tomorrow we celebrate Independence Day and I've coordinated my nails for the celebration!
For the ring finger, I started with a white base. Once dry I added two stripes of red. Once that was dry I polished the tip with blue. I used a toothpick and that silver polish pictured to make the stars.
I hope you have a fun and safe holiday!
Monday, July 2, 2012
Girl on Fire Nails
There are just too many good books to read this summer! I'm working my way through 50 Shades of Grey (obviously, who isn't?!) and The Hunger Games. While other, more, shall we say serious, books like In Defense of Food and the Seven Secrets of Synchronicity sit sadly on my nightstand, gathering dust.
To jump on The Hunger Games band wagon I did my interpretation of Girl on Fire nails!
I started by using blue painters tape over my tips, except the ring finger. I then applied the black polish to my nails and removed the tape. I gave my now bare tips a quick coat of white, then topped with China Glaze Electrify. To create the the "flame" on my ring finger I followed this tutorial from Oh So Pretty. I used white as a base and then layered on Electrify.
If I did this manicure again, I would do a skinnier tip. The thick glitter tip actually drove me a little bit nuts. The funny thing is, I have some kind of nail art, or at least plain black nails almost every day, however this particular manicure got tons, and I mean tons of attention...from men. I work with 100+ men, not to mention the countless others I see in the airport hangars, and everyone had a compliment on these nails. It was insane. It actually made me a little self conscious that so many males were noticing my hands! Ha ha! So if you give this style a shot, be prepared for some attention!
With that said, I have the 3rd book of 50 Shades to finish....brace yourselves, there will be a future post about those books too!
Thursday, June 21, 2012
Butterfly Wing Nail Art
I love butterflies. They are so graceful and delicate. I happen to have 2 butterfly tattoos. Yep, Im that girl. What can I say, you love what you love right? So I decided to try this butterfly wing inspired nail art. True to form, I just did my ring finger.
I didn't want to do a traditional French tip so I did sort of an ombre effect. I layered yellow polish, orange polish and another orangey-yellow polish. No special technique, I just kept swiping the polish on until I liked the color.
I did the same color technique on my ring finger, over the whole nail instead of just the tip.
Once that dried I used a toothpick and black polish to draw in the wing detail, and then a toothpick with white polish for the dots.
Next time, I'll try a nail art pen or a small brush to do the lines. They came out a little thicker than I'd have liked with the toothpick.
I do love the orange and yellow for summertime though!What is your favorite polish color for summer?
Monday, April 30, 2012
Tropical Gradient Hibiscus Nails
This week my nails were inspired by my friend Leslie. Leslie sent me a picture of a gradient manicure she gave herself, inspired by a Pinterest pin. She gave me a few pointers and I decided to give it a try. Since summer is practically here, I decided to go bright! I intended to do an angled gradient, but it turned out a little more vertical! I also added a white and purple hibiscus to my ring finger.

Monday, April 23, 2012
Decorative Scissors Nail Art
Welcome back from the weekend! Yeah, a little too enthusiastic for a Monday eh? I cant help it, this week my nails are screaming rock 'n' roll! I was cruising the nail polish at Target and came across a matte top coat. I had to try it! Normally I like my nails extra shiny but trying out the matte trend has been on my to-do list so I picked it up. This week I decided to do a half matte, half glossy look. Check it out....
First paint on the hot pink followed by a coat of shiny top coat. I allowed to dry for about an hour. Then I cut strips of blue painters tape. I trimmed the edge of the tape with some decorative scissors from my scrapbooking supplies. Gently press the tape to your fully dry nail, covering about half of the nail with tape. Make sure the decorative edge is sealed down tight. Then coat the exposed nail with black polish, then the matte top coat. Remove tape strips right away, while polish is still wet. This is tricky so be careful not to smudge! Allow to dry completely and you have this rock 'n' roll, shiny 'n' matte, funky manicure!Tuesday, March 27, 2012
Orange Leopard Nail Art
I've been wanting to try a leopard print for awhile now but my box of nail polish is overflowing. Buying a new color was just something I couldn't justify. So I decided to try it with a different shade, orange! I used orange polish as the base, gold and black for the print. If you've read my nail art posts before, you know that I only do my ring finger. I personally love the look, but also it makes nail art way less intimidating when you know you only need to do it twice instead of ten times!
Im loving the way the orange turned out!
Any suggestions for nail art I should try in the future?
Monday, March 12, 2012
Green Ombre Shamrock Nail Art
St Patrick's Day is fast approaching, and this year it falls on a Saturday! Are any of you planning big festivities to celebrate?
I got the party started early with a green ombre manicure and a little shamrock too!
The ombre effect is really easy to create. Grab a paper plate, and pour some clear polish onto it. Add 4-5 drops of your desired color (in this case, green). Using the color brush, mix together. Put a coat of the polish mixture on your nails. It will be very light in color.
Then, move about 1/3 of the way up your nail and put another coat on. Repeat a 3rd time, moving 2/3 of the way up your nail.
Let the polish set for a few minutes and then polish with a clear top coat.
I used the full strength green polish and a toothpick to create the shamrock on my ring finger. If you decide to do this, do it before you put on your clear top coat.
So, what are your plans for St Patrick's Day?
Monday, February 27, 2012
Tuxedo Nails
In honor of this week's Academy Awards, and inspired by Zooey Deschanel's Golden Globes manicure I rocked this look....
All I did was swipe on a coat of white polish. Once dry, I angled my black polish brush in the upper corner of my nail and pulled the brush toward me, repeating on the other side to create the V shape. With a toothpick I added the buttons and bow tie. Cute hey?
Wednesday, February 8, 2012
Love Letter Nails
This week I gave myself a Pinterest inspired manicure! Thanks to this PIN I tried Newspaper Nails!
It was super easy to do too. First, polish your nails with a light base color and let dry. Completely.
Cut up a few squares of newspaper. Dip your nail in rubbing alcohol and then press a newspaper strip to it. Making sure the alcohol soaks through the paper. Hold for 15-20 seconds and then peel the paper off. Make sure to top with a clear coat.
I decided this manicure needed a little Valentine's Day spin though. Staying true to my ring finger only obsession, I added a tiny heart.
Now it looks like a Valentine's Day love letter!
Tuesday, January 24, 2012
Chocolate and Gold Glitter Nails
Sticking with my ring finger detail obsession, I've done a chocolate and gold combination.
Monday, January 23, 2012
Black and Glitter Nails
No, I haven't abandoned the blog. I've just been taking some time for myself this month. After the holidays I was pretty burned out and overwhelmed. I decided that January would be a slow month for relaxation. I do have some projects to share with you this week though!
Today, I'm sharing another nail art style. This is a simple design with a subtle touch of glitter.
All you need is black polish and silver glitter polish. Put your two coats of black polish on. Let dry for a few minutes, and then do a coat of glitter polish. When doing the glitter polish, put it on in short, sporadic strokes. The idea is not to cover your full nail. Its almost like a messy glitter tip.
I loved wearing this all week! Check out your polish stash and try this look out. Maybe red and gold glitter!
Friday, December 23, 2011
Holiday Nail Art
I am in love with the ring finger nail art trend! Have you seen this?! Its great! You polish your nails, but do added art on your ring finger. You get the funky designs but with a whole lot less work! Check out my first attempt at sporting this look....
I rocked a zebra look to match my shoes and shirt. Then I decided to get in the holiday spirit. Every week this December I've worn a different design. Perhaps this will inspire you to have a quick holiday ring finger design!
The first week I did a french tip with a holly detail. I just used a toothpick dipped in polish to create this look.
I did a candy cane manicure by polishing my nail white, then using small strips of painters tape, I polished red over it!
And finally, the Christmas weekend look.....
Santa!!! Speaking of Santa, he stopped by my job today! I swear I channeled Buddy the Elf when I saw him!
Merry Christmas Everyone!
Monday, October 31, 2011
Halloween Spiders and Bloody Nails
Happy Halloween! This may come as a surprise, but Halloween is not my favorite holiday. I actually don't like it very much. I don't like being scared, I don't watch horror movies, and I have a phobia about people in masks. Halloween is fun in theory, but really it freaks me out.
However, any excuse to make a fun dessert, well, I'll take it!
Sorry for the less than fabulous photography, its getting darker earlier now. I don't get very much daylight when I get home from work anymore! Anyway....I made these little spider cakes for my coworkers.
I also thought I'd be festive and give myself a Halloween manicure. I followed this fun tutorial by Andrea, at Andrea's Choice. Check out how it turned out!
The red polish is really very red, but looks orange in this photo.
This is about how festive I get for Halloween. However, Thanksgiving and Christmas......now that's another story!
Whether this holiday is your thing or not, I hope you enjoyed it no matter what you did!
Wednesday, August 24, 2011
Product Review: Sally Hansen Crackle Polish
Lately, I've been really into nail art. I'm not all that good at it, but I love the possibilities. I was at Sally Beauty Supply recently and noticed the cashier's awesome crackled nail polish. She told me about Sally Hansen's Crackle Polish and I had to try it. LOVE. I stood there in Target debating, silver or black? Silver or Black? I chose silver, since I almost always wear black. Now, I will for sure be picking up the black!
Check it out....
I polished my nails with an aqua color and then put the silver topcoat on. In a matter of seconds it was starting to crackle. I cant stop looking at my nails they are so cool!
I did end up putting a clear top coat over this and it has really lasted. But again, I have acrylic nails so my polish always lasts longer than an average manicure. If you're looking for something fun and new try this out! There is nothing to it, and the color combo possibilities make it fun to experiment over and over again!
In these pictures I used "Fractured Foil". Enjoy!
PS...I should mention that I was not asked or paid to give this review. No one at Sally Hanson knows who I am or even cares what I think. I just took it upon myself to share a great product because frankly, I felt like it. I love it when someone real tells me a product is good, I feel a lot better about spending my hard earned money then. Enjoy!
Subscribe to:
Posts (Atom)