Tuesday, December 25, 2012

Holiday Home Tour

Merry Christmas my lovely readers! I hope you're all enjoying your holiday. Today I am sharing with you a quick tour of my holiday decor. Thank you so much for coming along on this blogging journey with me. My holidays are brighter because of this blog and the love shown by my readers. Have a blessed holiday my friends!

Home 1 
 Home 2 
 Home 3 
 Home 4 
 Home 5 
 Home 6 
 Home 7 
 Home 9 
Home 10 
Caesar and Sookie Holiday Pic

Monday, December 24, 2012

DIY North Pole Sign

This weekend my family came to visit from Wisconsin so we could celebrate the holiday together. My guest room is upstairs and I like to make that space festive too. This year I added a little something to the top of the stairs, a sign for the north pole!


I had some leftover PVC pipe from a different project that I used to create this. I wrapped the pole in some holiday ribbon I had on hand and I glued an ornament to the top. Using my Cricut I cut the North Pole sign from cardstock.  I wrapped the base with some white felt I also had on hand.
Pretty cute hey?
 
North Pole Sign 2 
 North Pole Close Up 
Merry Christmas!

Friday, December 21, 2012

Santa Wreath

I love holiday wreaths. I currently have 4 on display in my house. This year I wanted something fun for my front door so I made this Santa wreath. I took an old wreath form I had and wrapped it with red garland that I got for 99 cents at Wal-mart. I used a scrap of black fabric for the belt and some glitter scrapbook paper for the buckle. I also had a pack of glitter ornaments from the Dollar Tree, and added that for an extra sparkly touch.  All in all this entire project cost me less than $2 to make about 20 minutes to put it together!


How many wreaths do you have on display in your house?

Thursday, December 20, 2012

Christmas Nails

This year for Christmas I chose to do the Santa belt idea, similar to this one that I did last year. I paired it with green for a simple holiday look!


Merry Christmas!

Tuesday, December 18, 2012

Baking Soda Ornaments

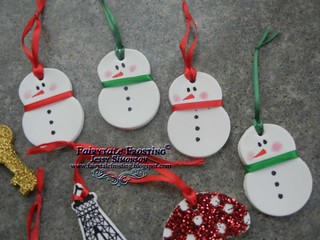
This year I wanted to make custom ornaments with my dog's paw prints, so I was cruising the blog-o-sphere for a good method. I found this recipe for baking soda ornaments and decided to try it out. This works a lot like salt dough ornaments but the white is a lot brighter.  I personally chose to let mine air dry because I didnt want to risk any browning. They took a little over 24 hours to dry.  Check them out!

Baking Soda Ornaments
Recipe adapted from Full of Great Ideas

Ingredients:
1 cup Baking Soda
1/2 cup Cornstarch
3/4 cup Cool Water
Fine Glitter (Optional)

Directions:
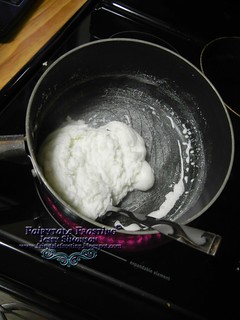
Mix cornstarch and baking soda in a pot. Add water to the mixture and stir into a runny mix.

Turn the stove onto medium heat. Stirring constantly mix until it becomes thick.  Once it starts forming a ball its done cooking.
Turn the ball over into a bowl, cover with a damp paper towel and allow to cool.
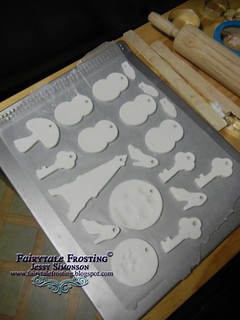
Once cooled, knead the dough until smooth. If you would like, at this step, pour in some fine glitter. I did this to add a little extra sparkle to the dough.  Knead the glitter until its incorporated into the dough.
Roll the dough out, use a little extra cornstarch if you need to.  Cut with cookie cutters of your choice. Don't forget to make a hole using a straw so you can hang them.
  Baking Soda Ornaments 
Let the ornaments air dry and then decorate as you see fit!
  Baking Soda Ornaments 
  Baking Soda Ornaments 
 Baking Soda Ornaments 
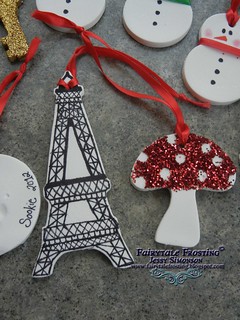
I used a sharpie to add the details to the Eiffel Tower
 Baking Soda Ornaments 
 Baking Soda Ornaments 
A little gold spray paint and some glitter made these sparkly keys. They might be my favorite.
The possibilities are endless! Make some fun ornaments or even turn them into gift tags!
Merry Christmas! 

Tuesday, December 11, 2012

Avocado Blue Cheese Dip

Last weekend I had some girlfriends over for movie night and made this dip. We devoured the bowl! This is a delicious dip, and during this season it is a great go-to recipe for those holiday parties!!


Avocado Blue Cheese Dip

Avocado Blue Cheese Dip
From My Kitchen Affair
Serves 4

Ingredients:
1 medium ripe avocado
2 Tbsp chopped onion
1/2 Tbsp lemon juice
1/4 cup sour cream
1/4 cup crumbled blue cheese
1/2 tsp salt
Black pepper (to taste)

Directions:
Peel and core avocado, scooping insides into a food processor. Add onion and lemon juice.  Puree until smooth.
Add sour cream, blue cheese, salt and pepper. Continue to blend until smooth. Season again with salt and pepper to taste. Top with more blue cheese crumbles.
Chill in the refrigerator for at least an hour before serving.

Because of the avocado in this dip, I would not recommend making this until the day of your event.
I also served this with Town House Sea Salt and Olive Oil Flat Bread Crisps.  I highly suggest the same combination!
Enjoy!

Wednesday, December 5, 2012

Rudolph Manicure

I was cruising Pinterest (surprise, I know) and saw this great idea from Blanket Print Nails for some festive nail art.  I had to try it myself!


I didnt use all of the colors mentioned, I used what I had at home already, but there are some great instructions on their site if you wanted to try this for yourself!
 

Monday, December 3, 2012

Cupcakes and Cocktails Birthday

Recently I did some cupcakes for a 50th birthday party. The theme was "Cupcakes and Cocktails" and the birthday lady had a love of shoes, handbags, martinis and the color red. Here are the cupcakes I did, along with a glitter champagne bottle and rosette cake!

50th Cocktails and Cupcakes 
50th Handbag Cupcake
 
50th Lipstick Cupcake
 
50th Martini Cupcake
 
50th Shoe Cupcake
 
50th Cocktails and Cupcakes Angle
 
50th Cocktails and Cupcakes 2

LinkWithin

Related Posts with Thumbnails