Showing posts with label Wine. Show all posts

Friday, June 21, 2013

Glow In The Dark Wine Glasses

Yesterday I posted about my DIY Patio Bar but there are a couple of other projects that go along with that. Today's project, glow in the dark wine glasses!!
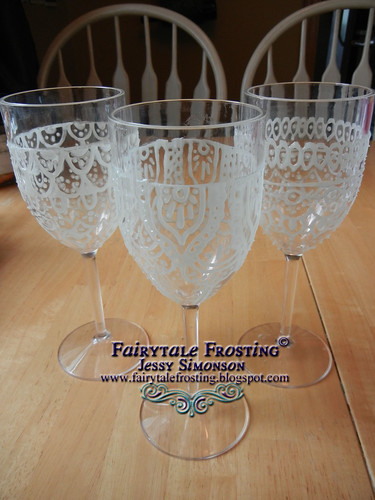
I wanted some fun wine glasses for the patio, but I didnt want to risk breakage. I picked up some plastic glasses on sale at Bed, Bath and Beyond for just under $2 each. Then I headed over to Michaels for the paint to decorate them.


BLOG 2Glow in the Dark Glasses
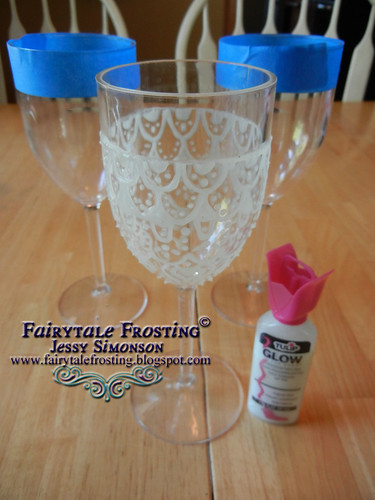
I grabbed a bottle of the Tulip Glow In The Dark Puffy Paint and got to work!
I decided to tape off the top of the glass for easier cleaning and so you dont have to put your lips on the textured puffy paint when drinking from them.
BLOG 3Glow in the Dark Glasses
I didnt follow any sort of pattern, I just sort of went at it. I did all of the designs freehand off the top of my head.
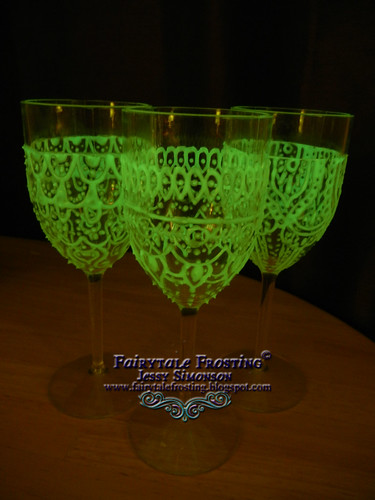
After "charging" them in the sunlight, this is how they turned out! Its a fun little touch when your patio party stems into the evening hours. 
 photo BlogSignaturecopy_zps136f6d8e.jpg

Monday, September 3, 2012

Drinks on the Patio Part III: Stake Holder

Last week I showed you how to make wine glass holders and beer holders both of which work great in the ground. However, if you're like me, you have a brick or concrete patio and stakes just don't really cut it. To solve this problem, I constructed these....
I wanted my drink stakes to sit basically at arms level so I picked up 2 terra cotta pots of the same size.
I have bright colors on my patio, so I painted the pots and then glued the bottoms together with E6000 Glue. I also glued 4 of those plastic furniture sliders to the bottom of the base pot. I found them at Target, and instead of using the foam stickers, I just glued them on.  This way, I can move the pots around without it scraping up my patio.
I filled the top pot with potting soil and in addition to adding in the stakes I planted some potato vine in it. To cover the dirt I used white dried kidney beans.
I do have another pot on my patio that's a bit larger and just a single one.  I used this for 2 wine glass holders and the wine bottle holder that came with my original purchased set (read about that here)
If you don't want the height of the stacked pots, the same principle applies to just using a single pot.  I filled that with potting soil and covered with kidney beans. 
Now you have a fun unique spot to hold all of your drinks while entertaining on your patio!

Tuesday, August 28, 2012

Drinks on the Patio

Its seems that lately everyone is starting to gear up for fall.  Don't get me wrong, I love fall.  It may be my favorite season.  But I am not ready to do away with summer just yet! While I still grasp at the warm weather and sunshine, I'm going to share with you some patio projects this week!
It all started when my sister gave me a set of wine glass stakes, complete with a bottle holder. My sis, knowing the wino that I am, thought I'd make great use out of them.  Stick a stake in the ground, to hold my wine glass, now thats awesomesauce. I was all excited to use them until I walked outside and realized, ah crap, we put a patio in last year! You cant stick a stake into brick!
That is when I started to get creative about how I could use these stakes. Quickly I realized that these stakes are freakin sweet, and I needed more of them. But they were also a little pricey. When I entertain on the patio, everyone must be able to put their wine glass in a cool stake because it really freaks drunk people out. "Dude! Why is your glass floating?!"  Yep, that does not get old my friends.  So this week in a series of posts, Im going to show you my projects which include, creating your own cheap-o wine stakes, beer holder stakes, and of course, a place to put them if you have a patio.  You dont have to have a patio to take advantage of these great projects.  A little spot of grass will do just fine.  Afternoon picnic in the park? Perf! 
So first up, here is my patio....
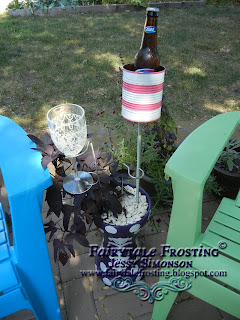
In this photo are some of the projects I'm going to show you this week!
This week you will learn how to make wine glass stakes, beer bottle (or can!) stakes, and drink stake stand.
Here's a close up if you needed it. 
Lets get started with our first project, wine glass holder stakes!
Stop in your neighborhood hardware/home improvement store.  I went over to Menards.  They have a section with yard sale signs, and these are sign stakes. They cost 99 cents each! Yep, read that again folks, 99 cents!!!  Grab a few of these stakes.  Each one will hold one single wine glass.  Oh! TIP! I highly recommend using plastic wine glasses.  Nobody likes broken glass.  Especially if it ends up in the bottom of your foot.  
Now, take these bad boys home and bust out a good pair of pliers, or some kind of tool you can use to hold and bend the metal.  You may work up a sweat, but its totally worth it.
You will start by bending the top loop.  Make it so the loop is parallel to the ground.
Leave that second loop alone.  Its handy for pushing your stake into the ground later.
Next, you'll want to pull the ring open.  Just wide enough that the stem of your glass can pass through it easily. Its handy to have a glass nearby to see how far you need to stretch the ring open.  The base of your glass will rest on the loop.
Stick that stake in the ground and slide your glass in! Viola!!  You are done! Floating wine glass, there you go!!  Now, pour your favorite bottle, and show off to all of your wino friends!!!
Stay tuned this week for more deets on how to satisfy your beer drinking friends!

**Note: I had to cut the length down on these stakes. They were a little tall for my stake holder.  I took about 6-7 inches off the bottom.  I would recommend testing it out before pouring wine and having it spill all over.  Alcohol abuse is just not acceptable people!

Monday, July 16, 2012

Wine Bottle Tiki Torches

You might not guess this from looking at me, but I'm a bit of a wine-o. A perfect night is hanging out on the patio with my girlfriends and a glass of wine. But, drinking wine means empty bottles and hanging out on the patio means mosquitoes, you know the Minnesota National Bird. When I saw a tutorial on Design Sponge for a wine bottle tiki torch I knew I had to try it.  I mean really, it solves both problems! Repurposing used wine bottles and keeps away mosquitoes. However, I did end up having to modify some things just slightly, so I made a tutorial too. Check it out!
 Supplies:
Wine Bottle (empty and cleaned)
3/8" Threaded Rod (This was sold in 3 foot lengths. I cut it into 4-5 inch lengths with a hacksaw)
2, Hex Nuts threaded for 3/8" rod
2, #10 x 1" Zinc Plated Wood Screws 
3/4" Split Ring Hanger, threaded for a 3/8" rod
Top Plate Connector, threaded for 3/8" rod
1/2" x 3/8" Coupling
1/2" Cap (this is optional, but I recommend it)
1/2" Teflon Tape
Replacement Tiki Wick
Citronella Tiki Torch Fuel (not pictured)

Now you're thinking, what? Where the heck do I find all of this stuff?! I found it all in the plumbling section at Menards.  All of it except the threaded rod, screws, hex nuts and tiki wicks.  The threaded rod, screws and hex nuts were located in the hardware section. My Menards store didnt have tiki wicks, but I found them at Target in their seasonal outdoor section. Oh and the citronella fuel was located in the outdoors section at either Menards or Target.
It took me awhile to find the stuff at Menards.  I'm not going to lie, having no prior plumbing experience or really any sort of construction experience, I looked like a lost puppy.  But with a little patience and a lot of reading of signs on bins, I found what I needed....and felt like a rockstar! I've since made 4 more torches and now know exactly where to look for everything. It was pretty fun having my boyfriend along for a supply trip and he didnt know where to look for any of this so I got to show him.  Ooooh yeah, victory is mine!

OK, now that you have your supplies together and your threaded rod cut into pieces, lets get your base set up.
Start by screwing your connector plate to your fence post (or other wood surface, where you intend to hang your torch---please be mindful that it is an open flame! Do not place your torch anywhere that could ignite surrounding things such as bushes, trees, etc)
1. Take your 2 wood screws and secure connector plate to post
2. Screw hex nuts to both ends of threaded rod.  Move the screws closer to the center of rod so that we can attach the connector plate and ring to the ends.
3. Connect the rod to the already secured connector plate.  Move the hex nut on that end all the way up to the connector plate.
4. Attached split ring hanger to the opposite end of the rod. Screw this in until the end of the rod is flush with the inside of the ring. Then, secure with the other hex nut.

Now lets prepare your bottle:
 Begin by taking the coupler and teflon tape. The coupler is a bit small to fit inside your wine bottle, so you will need to wrap the base with teflon tape.  You will wrap the thicker part of the base with the tape until it fits snuggly inside your bottle.  This is what will hold the tiki wick in place. Just keep wrapping with tape, keeping the tape as flat as possible. After a few wraps, you can test it in the bottle.  Keep wrapping until it fits snug and secure.
Once your coupler is properly wrapped you can pull it back out, thread the wick through and then put it back in.  You can also fill it with citronella fuel before reinserting the wick.  However, I waited until my bottle was securely hung before doing that. 

Next, you will open the screws on the split ring, place your bottle in between the ring and then tighten the screws.  BE CAREFUL not to tighten them too tight, you don't want to break the glass!! Just tighten each side until it holds the bottle securely.
**Note: the 3/4" split ring fits most wine bottles.  It fit all of mine. However, you can always go up to a 1" split ring if you have a larger bottle, or a 1/2" split ring if you are using a smaller bottle.
At this point, I pulled out the wick again and used a funnel to pour in my citronella fuel. Then reinsert the wick.
When not using the torches, you will place the cap on the wick.  DO NOT make the mistake I made...I pushed the cap down onto the wick, which them pushed the wick out of the coupler into the bottom of the bottle.  I had to fish it out with a skewer, it was just a hot mess. 
When you put the cap on make sure to just gently set it on top of the wick.  The cap is optional, but I recommend using it to help keep your wick dry from dew and rain when you arent burning it.
One last tip, I do also recommend letting your wick sit in the oil, in the bottle, before you start to burn it.  In other words, I know you are excited that you just hung up your torch, but wait about 10 minutes and then marvel in your awesomeness.


That's all there is to it! Enjoy!

Monday, December 26, 2011

Red, White and Gold Holiday Table

Greeting everyone! I hope you all had a fantastic holiday weekend.  Today I'm sharing with you my Christmas holiday table. I was inspired by this table from Hostess with the Mostess and I took advantage of the spectacular printables they offered!
I made a variety of Christmas topiary trees with candle holders I had around the house.
I love the red swirl glasses from Pier One, but $7 per glass was more than I wanted to spend. Instead I bought Dollar Store wine glasses and painted swirls on with Martha Stewart craft paint!

Stay tuned tomorrow for more of my family holiday weekend!

Monday, December 5, 2011

Reindeer and Figs

This weekend, I accomplished a big personal goal and I want to share it with you. I ran in my very first 5k race! For the last 9 weeks, my friend Heather and I trained doing the Cool Running Couch to 5k Program. It all started back in 2008. I set a goal to lose weight and run a 5k.  If you've ever tried to lose weight before, you know what a struggle that can be. I didn't have a running partner, or the will power to keep up with either goal. But each year, I kept saying I'd do it. Finally, this year, 2011, a full 3 years later, my friend was willing to commit to the program with me.  Turns out a dedicated partner is what I needed! We met consistently 3 times a week to run. At first, it was a challenge. Our runs were slow. The first minute or two of running, I thought I was going to die. I watched the clock constantly, just waiting for it to be over. But as the days and weeks went on, I slowly became stronger, found running easier and easier. I was looking less at the clock, and more focused on my breathing. 
We chose to do the Reindeer Run because the timing was perfect, we both love the holiday season, and costumes were encouraged! Not to mention the proceeds benefited Toys for Tots Heather, my boyfriend David, and myself ran the 5k. We set a goal of finishing in 40 minutes. We finished in 38 exactly. It was amazing.  I've wanted this goal for so long. The fact that it was real, that we did it, that we crossed that finish line still amazes me. Its an incredible feeling to set your mind to a difficult goal and actually make it happen. Its not just about losing weight or getting in shape.  Its about feeling empowered. If I can make this happen, who knows what else I might be able to accomplish!  Here are a few pictures from Saturday's event....
 Costumes were encouraged, so here I am with Rick. Rick is Heather's boyfriend who offered to photograph everything for us.
Here we are with the Reindeer mascot!
Rick was easily able to spot us due to my hat!
We are almost to the finish line!
FINISHED!! We ROCKED this race! 

Now you're probably wondering, whats with the figs in the title? In addition to sharing my awesome accomplishment, I'm going to share my new favorite recipe. You may recall my recent post about the Wonderfall Wine Tasting one of the courses was a Fig and Gorgonzola Pizza.  It is absolutely to die for! You must make this now! The pairing of flavors is incredible. Sweet, savory, all mixed into one. Its unique and flavorful. Its also, very easy!
Fig, Gorgonzola Prosciutto Pizza
(very slightly adapted from Centsational Girl)

Ingredients:
1 Boboli Thin Crust Pizza (I used a 12 inch)
Olive Oil
4 ripe Figs
1 3/4 cup shredded mozzarella cheese
4 oz. container crumbled Gorgonzola cheese
2 slices prosciutto
Diced green onion (I didn't really measure this, just chopped a handful)

Directions:
Preheat oven to 400 degrees.  Drizzle olive oil over crust. Bake for 9 minutes.
Meanwhile, slice figs, dice onion, tear prosciutto into pieces.
When crust is ready, layer about half the mozzarella cheese, then half the Gorgonzola, then the figs, prosciutto, and onion. Top with remaining cheeses.  Bake until golden brown, and cheese is bubbly, approximately 10 minutes.
Prepare to be amazed.
We paired this with a pinot noir and it was excellent.

Thanks for reading my story and I hope you enjoy the pizza!

Monday, November 21, 2011

Wonderfall Wine Tasting

Last week I needed to take a break from blogging. Life got a little crazy and I got a little burned out. But, things are settling back to normal, so let me share with you some of the things I've been up to!  Today, I'd like to share with you a wine tasting party I hosted.  Last year, I was doing my 1 party a month challenge and in November I hosted this Paris themed wine tasting party.  My friends and I had so much fun, we decided to make it an annual fall tradition.  The holiday season can be really hard for everyone to coordinate their schedules so we get some girl time in just before the insanity!
This year's theme was Wonderfall Wine Tasting. Okay, okay, so I didn't come up with the name all on my own. Hopefully Pier 1 isn't too mad I used their fall slogan!
For our wine tasting party this year, I planned a menu of appetizers and desserts and asked each person to bring a bottle of a certain wine. They were given their wine assignments and could choose any wine of any price within that variety.  This way, the stress (and cost!) is taken off of me, and everyone gets to contribute to the fun!
I set up this whimsical tasting table for us to sit, taste, and enjoy our food and company!
Over table I hung orange paper lanterns that were embellished with cardstock and floral wire to look like pumpkins. 
I also made these wine bottle candle holders! I found this PIN and followed the tutorial! One word of advice, use rubbing alcohol instead of nail polish remover.  And let it burn until it goes out.  Works waaay better and is a lot less frustrating!
Each place setting had a tasting notes sheet.  It indicated who brought the wine and a space to write in what the wine was, also what food it was paired with.  You could make notes as well as indicate a star rating.
For our final course I made mini pies for each guest.  I was inspired by this PIN for the leaf crust. 

We had such a fun time, and every single wine we tasted rocked! 

Thanks for stopping by!


Tuesday, November 23, 2010

Swanky Parisian Soiree

I am busting at the seams to show you this party! For my November Party Challenge event I hosted a Parisian Inspired Wine Tasting. A few girlfriends came over for a wine and cheese pairing, complete with dessert buffet. Behold the amazingness!
Fortunately, I already have a Paris theme in my living room. I strategically moved furniture around to have my buffet table set up just under my enormous Paris picture. Want to know a great secret? Almost everything on this table was under $1!! But before I get to that, lets marvel at the gingerbread Eiffel Tower!

This is my absolute favorite piece of this event. I spent days baking gingerbread, covering with fondant, and accenting with royal icing. I am quite proud of this baby!

I did two small cakes for this table. However, boring cake stands just did not seem the way to go. So I picked up goblets at the Dollar Store. Spray painted them black, along with a serving tray. Add some gorilla glue and now I have a cake stand ready for this table!


I made shortbread cookies decorated with the theme colors and a few French words (the ones I know of course!)

Brown Sugar and Spice Eiffel Tower cookies were also on the table. Not pictured is French chocolate macaroons, chocolate mousse cups and red wine truffles, all made by yours truly. I know, I'm a busy lady.

Here is the "tasting table" where we samples wines, cheeses, and of course took tasting notes on our favorite pairings.
I made the centerpiece from Dollar Store taper candles, and spray painting wine bottles and beer bottles.
Lets take another look at the table! You can see in this photo the glittery candelabras and in a previous photo, glittered chandeliers, all bought in the "Dollar Spot" at Target.
To run down the cost of decorating this table....
2 Glitter Chandeliers: $2
2 Glitter Candelabras: $2
4 Wine Goblets: $4
2 Serving Trays: $2
2 Taper Candles: $1 (50 cents each at the Dollar Store)
2 Wine Bottles: $0 (already had them, just needed spray paint---which I also already had)
Tablecloths: $0, they are my bedroom curtains
Paris Backdrop: $0, already hanging in my living room.
Paris Title Sign: $0, again, already owned
Total cost to decorate this table: $11, yep you read that right. $11.

This has been my favorite party yet! It was so fun to do! I'm also sharing with you my favorite photo of the night...My two pups, Caesar and Sookie got dressed up for the occasion. We tried to get a good photo together, but they were more interested in giving me kisses.
I hope you enjoyed this party, I think I'm proudest of the party so far!

LinkWithin

Related Posts with Thumbnails