Showing posts with label Beauty. Show all posts

Thursday, April 26, 2012

No Heat Curl Methods: A Review

I have really long thick hair and sometimes wearing it straight everyday gets boring. However I am also really lazy, so styling my hair for work is pretty low on my priority list. I decided to test drive some no heat curl methods. How much easier could it be, wash hair, roll into curls, sleep, wake up, look amazing. Right? Here are my reviews on a few methods. (Please excuse the less than flattering photos of me...I start work at 6am.  I dont look human for at least another 2-3 hours!)

Technique #1: Andrea's Choice Twist Curls (See the tutorial HERE)
For this method you basically divide damp hair into sections, twist around each other, pin into place, sleep and then untwist.


 This technique was really easy to do, however I was not impressed with the results. My curls were not well defined even after styling gel and mousse. As the day wore on they became giant frizz twists.
Score: Fail

Technique #2: Braided Waves
For this technique I divided my damp hair into sections, braided it, slept, then undid the braids.
Like the twist technique my curls were more wavy than defined and became increasingly frizzy as the day wore on. Also, tying the ends of the braids with hair bands left kinks and straight ends.
Score: Fail

Technique #3:  The Sock Bun (You can view the tutorial HERE)
For this technique you roll your damp hair around a sock, sleep, unroll and apparently get amazing curls
I tried this technique 3 separate times and each time my hair turned out like this. Frizzy, no real defined curls, just basically a mess.
Score: Fail

Technique #4: Sock Roll Curls
A friend explained to me how to do this, she did it on her daughter's hair.  You take damp hair, divide in sections. Wrap each section around a sock.  Roll each sock to your crown and tie the ends together. Sleep. Wake up, untie each sock and curls! I saw the pics of my friend's daughter and her curls turned out great! So I was optimistic.
 This is what it looked like when I first unrolled the socks. Unfortunately, only a few curls in the front even looked like curls.....
After some styling gel and mousse it became this giant mess. Unfortunately my curls were not cute and bouncy like my friend's daughter. They were mostly a tangle mess.
Score: Better than fail but not a pass.  This method has potential.  My friend's daughter had great curls, so I know its possible.  But maybe just not on my hair. *sniffle*

Technique #5: Twisty Roller Curls (You can view the tutorial HERE)
This technique required me to purchase twisty bendy rollers (yes that's the official term).  I picked up a cheap set from Sally Beauty Supply.

These curls turned out lovely, very tight and defined.  However due to sleeping on the rollers some of the curls weren't really curling in the right direction.  Also, sleeping on these rollers sucked. I wrapped my hair in a silk scarf to keep them all in place. It was extremely uncomfortable.
Score: Pass but not perfect. If the rollers were more comfortable, this would be perfect! Perhaps a different kind than what I bought would work better.

Technique #6: Bohemian Headband Curls (View the tutorial HERE)
For this technique you wrap damp hair around a headband, sleep, unroll, curls!


The first picture is when I first unrolled the headband. Then a closeup, then what my hair looked like at the end of my work day. I actually had forgotten to put any product in my hair, so I was pretty impressed with how well the curls held after a 9 hour day.
Score: Pass
This method had the most consistent and nice looking curls.  There wasn't much for kinks or frizz, and that was also without product! The curls aren't quite as nice as heat styled curls, but they serve as a great alternative.

Technique #7: The Scrunch and Go
This is my usual curl technique. Wash my hair, scrunch with gel and mousse, air dry. This works great on hot summer days.  However going into work with wet hair just isnt really the look I'm going for.
Score: Pass.  The curls are great for a daytime look in the summer, but it doesn't dry quick enough in the morning for me to do it for work without going into the office with wet hair. Its also not great in Minnesota winter.  Nobody likes icicle hair. But overall, great curls....but then again, it is my natural texture! 

I hope you enjoyed this review and maybe found some techniques to try! If you do, please leave your reviews in the comments.  I'd love to see how these work for different types of hair.


Monday, April 23, 2012

Decorative Scissors Nail Art

Welcome back from the weekend! Yeah, a little too enthusiastic for a Monday eh? I cant help it, this week my nails are screaming rock 'n' roll! I was cruising the nail polish at Target and came across a matte top coat.  I had to try it! Normally I like my nails extra shiny but trying out the matte trend has been on my to-do list so I picked it up.  This week I decided to do a half matte, half glossy look. Check it out....
 First paint on the hot pink followed by a coat of shiny top coat. I allowed to dry for about an hour. Then I cut strips of blue painters tape. I trimmed the edge of the tape with some decorative scissors from my scrapbooking supplies. Gently press the tape to your fully dry nail, covering about half of the nail with tape. Make sure the decorative edge is sealed down tight. Then coat the exposed nail with black polish, then the matte top coat. Remove tape strips right away, while polish is still wet. This is tricky so be careful not to smudge! Allow to dry completely and you have this rock 'n' roll, shiny 'n' matte, funky manicure!

Monday, April 2, 2012

Makeup Organization Ideas

Spring has finally arrived! That also means its time for spring cleaning. One of the many organization projects I have on my list is to get my makeup under control. I do not wear much makeup.  Mostly eye makeup and lipstick/gloss. Somehow my "minimal" approach to makeup still dominated my bathroom. I decided it was time to purge.  I got rid of a lot of shadows and liners that are old and I'll probably never wear again. I sorted my makeup into categories of everyday wear and special occasion wear. The special occasion (a.k.a. makeup in crazy colors that I can only pull off at night, on the town with the girls) was neatly put away in a case in the closet. Then I was left with my everyday wear.  It was not enough to make it worthwhile to put in a big bulk case, but not small enough to just leave out.  I decided to try magnets!
I glued magnets to the backs of all of my shadows and....
Viola! Now all my everyday shadows are on the inside of my medicine cabinet!  Off the counter, out of the way.  I love it and so does my boyfriend who is cursed to a life of sharing a bathroom with a girl.
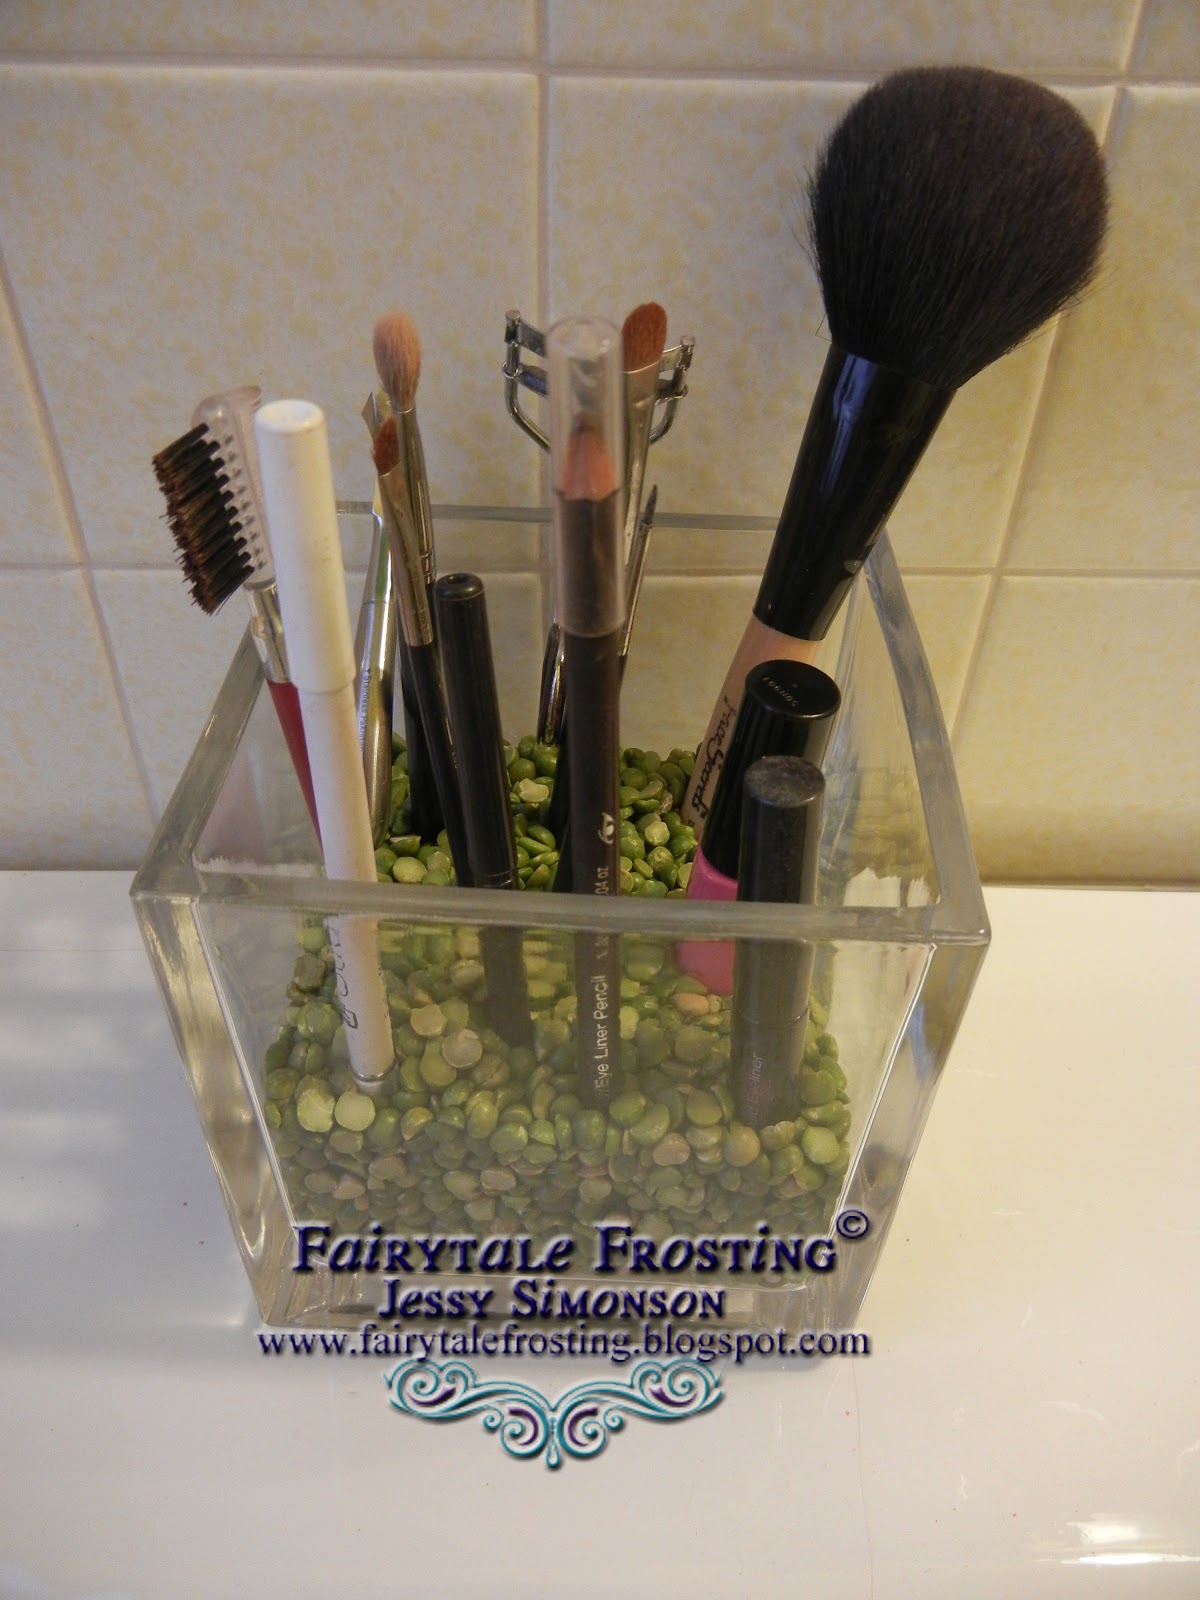
Now there was of course the pesky question of what to do with my brushes, liners and mascara. So I headed over to Michael's with my handy 40% off coupon and picked up a square vase.  Then I stopped at the grocery store and picked up a 99 cent bag of split peas....
Taaaa Daaa!! Organized brushes and liners! Now everything is in plain view...no more digging around in my bottomless pit of a makeup bag. 
It all looks so nice and neat that even my boyfriend thought makeup organization was cool.

What spring cleaning projects are you working on?

Tuesday, March 27, 2012

Orange Leopard Nail Art

I've been wanting to try a leopard print for awhile now but my box of nail polish is overflowing. Buying a new color was just something I couldn't justify.  So I decided to try it with a different shade, orange! I used orange polish as the base, gold and black for the print.  If you've read my nail art posts before, you know that I only do my ring finger.  I personally love the look, but also it makes nail art way less intimidating when you know you only need to do it twice instead of ten times!
Im loving the way the orange turned out!
Any suggestions for nail art I should try in the future?

Monday, March 12, 2012

Green Ombre Shamrock Nail Art

St Patrick's Day is fast approaching, and this year it falls on a Saturday! Are any of you planning big festivities to celebrate?
I got the party started early with a green ombre manicure and a little shamrock too!
The ombre effect is really easy to create.  Grab a paper plate, and pour some clear polish onto it.  Add 4-5 drops of your desired color (in this case, green).  Using the color brush, mix together.  Put a coat of the polish mixture on your nails.  It will be very light in color.  
Then, move about 1/3 of the way up your nail and put another coat on.  Repeat a 3rd time, moving 2/3 of the way up your nail.
Let the polish set for a few minutes and then polish with a clear top coat.
I used the full strength green polish and a toothpick to create the shamrock on my ring finger.  If you decide to do this, do it before you put on your clear top coat.

So, what are your plans for St Patrick's Day?

Monday, February 27, 2012

Tuxedo Nails

In honor of this week's Academy Awards, and inspired by Zooey Deschanel's Golden Globes manicure I rocked this look....
 Pin It

All I did was swipe on a coat of white polish. Once dry, I angled my black polish brush in the upper corner of my nail and pulled the brush toward me, repeating on the other side to create the V shape. With a toothpick I added the buttons and bow tie.  Cute hey?


Wednesday, February 8, 2012

Love Letter Nails

This week I gave myself a Pinterest inspired manicure! Thanks to this PIN I tried Newspaper Nails!
It was super easy to do too. First, polish your nails with a light base color and let dry. Completely.
Cut up a few squares of newspaper. Dip your nail in rubbing alcohol and then press a newspaper strip to it. Making sure the alcohol soaks through the paper. Hold for 15-20 seconds and then peel the paper off. Make sure to top with a clear coat.

I decided this manicure needed a little Valentine's Day spin though. Staying true to my ring finger only obsession, I added a tiny heart.
Now it looks like a Valentine's Day love letter!

Tuesday, January 24, 2012

Chocolate and Gold Glitter Nails

Sticking with my ring finger detail obsession, I've done a chocolate and gold combination.

I used Chanel Haute Chocolate on my nails. Its a beautiful chocolate with flecks of gold in it. Then on my ring finger, I put a coat of clear polish and sprinkled fine gold glitter on it. Let that dry for a few minutes and cover with a another coat of the clear polish.  Easy sparkle!  I got tons of compliments on this look.  Cant wait to try other colors of glitter!

Monday, January 23, 2012

Black and Glitter Nails

No, I haven't abandoned the blog.  I've just been taking some time for myself this month. After the holidays I was pretty burned out and overwhelmed.  I decided that January would be a slow month for relaxation.  I do have some projects to share with you this week though! 
Today, I'm sharing another nail art style. This is a simple design with a subtle touch of glitter.

All you need is black polish and silver glitter polish.  Put your two coats of black polish on. Let dry for a few minutes, and then do a coat of glitter polish.  When doing the glitter polish, put it on in short, sporadic strokes.  The idea is not to cover your full nail.  Its almost like a messy glitter tip.
I loved wearing this all week!  Check out your polish stash and try this look out. Maybe red and gold glitter!

Friday, December 23, 2011

Holiday Nail Art

I am in love with the ring finger nail art trend! Have you seen this?! Its great! You polish your nails, but do added art on your ring finger.  You get the funky designs but with a whole lot less work! Check out my first attempt at sporting this look....
I rocked a zebra look to match my shoes and shirt.  Then I decided to get in the holiday spirit. Every week this December I've worn a different design.  Perhaps this will inspire you to have a quick holiday ring finger design!
The first week I did a french tip with a holly detail.  I just used a toothpick dipped in polish to create this look.
 I did a candy cane manicure by polishing my nail white, then using small strips of painters tape, I polished red over it!
And finally, the Christmas weekend look.....
Santa!!! Speaking of Santa, he stopped by my job today! I swear I channeled Buddy the Elf when I saw him!
Merry Christmas Everyone!


Monday, October 31, 2011

Halloween Spiders and Bloody Nails

Happy Halloween! This may come as a surprise, but Halloween is not my favorite holiday. I actually don't like it very much. I don't like being scared, I don't watch horror movies, and I have a phobia about people in masks. Halloween is fun in theory, but really it freaks me out. 
However, any excuse to make a fun dessert, well, I'll take it!  
Sorry for the less than fabulous photography, its getting darker earlier now. I don't get very much daylight when I get home from work anymore!  Anyway....I made these little spider cakes for my coworkers.
I also thought I'd be festive and give myself a Halloween manicure. I followed this fun tutorial by Andrea, at Andrea's Choice.  Check out how it turned out!
The red polish is really very red, but looks orange in this photo. 
This is about how festive I get for Halloween.  However, Thanksgiving and Christmas......now that's another story!
Whether this holiday is your thing or not, I hope you enjoyed it no matter what you did!

Thursday, September 29, 2011

Beauty Tip: Baking Soda Mask

I am 30, I should not still be struggling with acne. I've had terrible acne my whole life.  Now that I'm older, its not like when I was 15 but its still annoying. I'm currently going through one of those really bad break out weeks. You know the kind where you have tons of painful pimples exploding all over your face?! Not to mention the nasty black head craters that stare at you in the mirror. Yeah. Obnoxious.
Last night I stumbled upon this random tip to help clear up acne prone skin: Baking Soda
 I've been struggling with oily skin, and really painful inflamed pimples for 2 weeks. I am desperate to try anything. I don't wear much in terms of foundation or cover up so my redness is there for all to see. So I tried this baking soda idea out and no kidding, it WORKS!
Baking Soda

Photo Source: All You (click for more great baking soda uses!)

Now, let me be clear, this did not make my pimples disappear.  However it greatly reduced the redness and swelling, as well as the pain.  Also, my black heads were greatly reduced as well.  My nose doesn't look like its covered in them!
My skin felt soft, like baby soft. It felt awesome.  Way better than any other drug store face mask I've tried in the past.  
I applied my nighttime routine, went to bed, and the next morning, still not inflammation.  I'm sold.

Try it for yourself. I'm not a dermatologist so who knows how this work for everyone, but it worked for me, so hopefully it will help ya out on those less than flawless skin days.

Directions:
Mix 2 parts Baking Soda to 1 part water
Make a paste and smooth onto skin, thickly covering any problem areas
Allow to dry for about 10 minutes, then rinse
Feel your skin and be amazed.

*Note: I used 2 teaspoons baking soda, 1 teaspoon water plus a few extra drops because it was a little dry. This was more than enough for my face and neck.

Wednesday, August 24, 2011

Product Review: Sally Hansen Crackle Polish

Lately, I've been really into nail art.  I'm not all that good at it, but I love the possibilities. I was at Sally Beauty Supply recently and noticed the cashier's awesome crackled nail polish.  She told me about Sally Hansen's Crackle Polish and I had to try it.  LOVE. I stood there in Target debating, silver or black? Silver or Black?  I chose silver, since I almost always wear black.  Now, I will for sure be picking up the black!
Check it out....
I polished my nails with an aqua color and then put the silver topcoat on.  In a matter of seconds it was starting to crackle. I cant stop looking at my nails they are so cool!
I did end up putting a clear top coat over this and it has really lasted.  But again, I have acrylic nails so my polish always lasts longer than an average manicure.  If you're looking for something fun and new try this out! There is nothing to it, and the color combo possibilities make it fun to experiment over and over again!
In these pictures I used "Fractured Foil".  Enjoy!

PS...I should mention that I was not asked or paid to give this review. No one at Sally Hanson knows who I am or even cares what I think. I just took it upon myself to share a great product because frankly, I felt like it. I love it when someone real tells me a product is good, I feel a lot better about spending my hard earned money then. Enjoy!

Tuesday, August 16, 2011

Product Review: Sally Hanson Salon Effects Nail Strips

Do you ever come across a product that actually lives up to expectations and you are so excited you share it with everyone you know?  Today I want to share my own personal review of Sally Hanson Salon Effects Nail Strips. Recently I tried out the cheetah print strips....
 Try to focus on the polish, not my creepy hands. By the way, its really hard to take a decent photo of your own hand without it looking weird and kind of like an alien.  Anyway, these strips are so easy to put on.  You pick the size closest to your nail and press it on.  It even comes with a little nail file to file the edges of your nails.  Now if you're kind of cheap, like myself, you could use the left over pieces of strips (and the full unused ones) and give yourself a matching pedicure!  (My feet are even scarier, so I didn't photograph those).  Seriously, my "mani and pedi" was done in about 5 minutes flat.
Now I have acrylic nails, so these babies lasted about two weeks before they started to look worn. There are two slight drawbacks to these strips.  First, they run almost $9.  That's steep for a cheap-o like me.  However, much cheaper than going to a salon.  Also, they are kind of a pain to take off.  Since I have (and do my own) acrylic nails, I use a non-acetone polish remover.  Sheesh, it took forever! But I'm guessing if you use regular remover, they will come off easier.
If you've been looking at these boxes, wondering if you should take a chance on them, I recommend you go for it.  I cant tell you how many compliments I got on these.  Zero dry time makes it pretty appealing as well.
Do you have a product you just love that really lived up to the hype?

PS...I should mention that I was not asked or paid to give this review.  No one at Sally Hanson knows who I am or even cares what I think.  I just took it upon myself to share a great product because frankly, I felt like it.  I love it when someone real tells me a product is good, I feel a lot better about spending my hard earned money then. Enjoy!

Monday, August 1, 2011

Inspired Monday: Pink Monarch Nails

I. Am. In. Love.
Source: None via Jessy @ on Pinterest


Guess who is trying this technique out soon?! Perfect for summer!

LinkWithin

Related Posts with Thumbnails