Showing posts with label Beverages. Show all posts

Friday, June 21, 2013

Glow In The Dark Wine Glasses

Yesterday I posted about my DIY Patio Bar but there are a couple of other projects that go along with that. Today's project, glow in the dark wine glasses!!
I wanted some fun wine glasses for the patio, but I didnt want to risk breakage. I picked up some plastic glasses on sale at Bed, Bath and Beyond for just under $2 each. Then I headed over to Michaels for the paint to decorate them.


BLOG 2Glow in the Dark Glasses
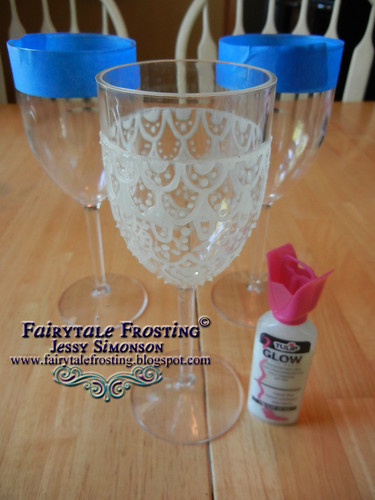
I grabbed a bottle of the Tulip Glow In The Dark Puffy Paint and got to work!
I decided to tape off the top of the glass for easier cleaning and so you dont have to put your lips on the textured puffy paint when drinking from them.
BLOG 3Glow in the Dark Glasses
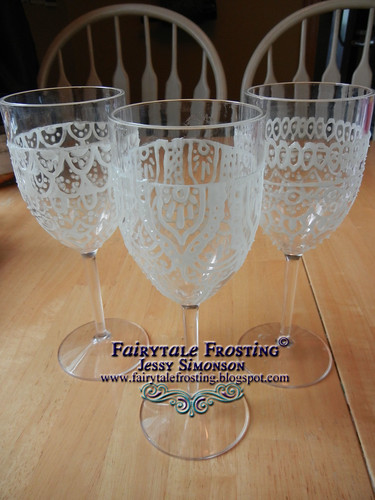
I didnt follow any sort of pattern, I just sort of went at it. I did all of the designs freehand off the top of my head.
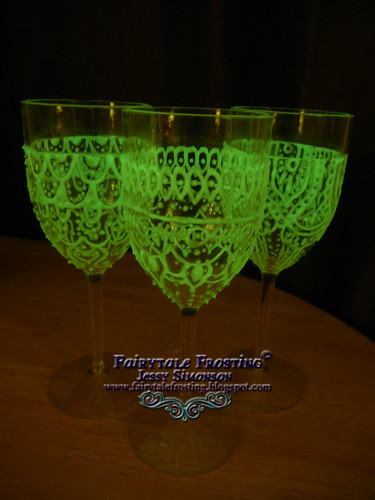
After "charging" them in the sunlight, this is how they turned out! Its a fun little touch when your patio party stems into the evening hours. 
 photo BlogSignaturecopy_zps136f6d8e.jpg

Tuesday, October 9, 2012

Pumpkin Pie Hot Chocolate

Yesterday I posted a recipe for a Salted Caramel Pumpkin Coffee.  Today I have a recipe for something you can drink in the evening! Pumpkin Pie Hot Chocolate!
Pumpkin Pie Hot Chocolate
Original Source: Rachael Ray
Ingredients:
2 cups milk
1/2 cup hot chocolate mix
3 tbsp pumpkin (fresh or canned)
1 tsp pumpkin pie spice
Whipped cream

Directions:
Mix all ingredients except the whipped cream in a sauce pan.  Heat until it warm and steamy.  Do not boil. Pour into mugs and top with whipped cream. Serves 2. 

I love the chocolate and pumpkin combination! Yum! Great for these chilly autumn nights!

Thursday, September 20, 2012

DIY Mason Jar Cup

The leaves are turning, the air is getting cooler and that means its autumn! This is the time of year where we have friends over for fires, make smores, and get cozy in our hooded sweatshirts. Its also a great time to bust out some mason jar cups!! Here's how you can make some of your own.  Lets gather your supplies...
You will need:
Clean mason jars with rings and lids
Crop-a-dile Big Bite Punch (or hammer and nail will work)
#14 Finishing Washers (I found these at Menards in the nuts/bolts/screws section)
E6000 Glue
Straws

Here is a close up of those washers.  It took me a little while to find them.  At my Menards they were hanging above the screws and washers.
The next step is to remove the lids from your jars and punch a hole with your punch. You will need to punch a few holes to get your straw to fit.  I used the washer as a guide to determine where I needed to expand the hole.
After your holes are punched, you will glue a washer on top of the lid.  Once dry, also glue one on the bottom of the lid.
After all is dried, you can then enjoy your favorite drink in your jar!
If you've been following along on my posts about drinks on the patio you'll remember the beer bottle holder I made.  It just so happens to be a perfect fit for a mason jar too.
Enjoy your patio drinks this autumn!

Wednesday, August 29, 2012

Drinks on the Patio Part II: Beer Holder Stake

To continue yesterday's post, today I'll show you what you need to make a beer holder stake!
You will need:
1 Empty Can       
  *I used an empty tomato sauce can, and chose the bigger size. I wanted a bit more flexibility of the type of drinks I could put in it.  Bigger can felt like it would give me that flexibility.
Threaded Rod (I used 3/4", you can use 1/2" or whatever you prefer)
2 Washers (make sure to buy them to fit the size rod you have)
2 Bolts (again make sure they will fit the size rod you have)
Drill or large nail and hammer to make a hole in the can
Glue (I used E6000)
Spray paint (optional)
Hack Saw (or other saw to cut threaded rod if necessary)

Directions:
1. If you desire, spray paint your can whatever color you like.
2. Once can is dry, use your drill or hammer/nail to punch a hole in the bottom of the can.
3. Cut your threaded rod (if needed) to desired height for your beer holder to sit
4. Place first bolt on the threaded rod, move a few inches down.
5. Place first washer on top of the bolt.
6. Slide the can on, then inside the can, add the second washer, followed by the bolt
7. Hold the can flush against the inside washer and tighten the bold until the rod is flush with the top of the bolt.
8. Turn your can over and add a dab of glue to the bottom of the can, then slide the washer on top of the glue.
9. Tighten the bottom bolt until flush against the base of the can.
10. Allow to dry, then stake in the ground and enjoy your beer! (or water, or other bottled beverage that you want to fit in there!)

Stay tuned in! Tomorrow you can learn how to make stake holders for your patio!

Tuesday, July 19, 2011

Rhubarb Soda and a Rhub-tini

Rhubarb season was drawing to an end and I had tons left in my garden.  I came across THIS recipe from a local Minnesota website.  Rhubarb soda!  I recently purchased a Soda Stream machine and thought this would be a delicious addition to my usual sparkling water.
Here's how you can try out this refreshing summer drink!
1 cup rhubarb, chopped
1 cup sugar
1 cup water
Add all ingredients to a small saucepan and bring to a boil. Once boiling, reduce heat to low. Simmer for 20 minutes, or until rhubarb falls apart. Strain in a mesh strainer and let cool.
Once cool, stir with sparkling water.  Add syrup to taste.  

Fruit "Soda" is delicious but I was in the mood for something stronger.  A Rhub-tini was sounding pretty awesome!
I mixed together vodka and some rhubarb soda. Shake with ice, strain into a chilled glass.  Then I poured rhubarb syrup in the glass, adding to taste. 
I'm thinking this could be a good idea for raspberries too soon!

LinkWithin

Related Posts with Thumbnails