Showing posts with label Our Home. Show all posts
Tuesday, December 25, 2012
Holiday Home Tour
Merry Christmas my lovely readers! I hope you're all enjoying your holiday. Today I am sharing with you a quick tour of my holiday decor. Thank you so much for coming along on this blogging journey with me. My holidays are brighter because of this blog and the love shown by my readers. Have a blessed holiday my friends!
Tuesday, November 27, 2012
Our Thanksgiving 2012
While everyone is kicking off their Christmas holiday posts, I'd like to share a little about my Thanksgiving!
Here are some pics of my dinner table.
It was the most delicious turkey I've ever made! None of it was dry, it was juicy and tender and flavorful. Yum! My turkey may have turned out, but my pumpkin pie was kind of a disaster. However, I got creative with the crust scraps and made the best of it. It still tasted great!
Did you enjoy your Thanksgiving? Did you try any new recipes this year?
Here are some pics of my dinner table.
It was the most delicious turkey I've ever made! None of it was dry, it was juicy and tender and flavorful. Yum! My turkey may have turned out, but my pumpkin pie was kind of a disaster. However, I got creative with the crust scraps and made the best of it. It still tasted great!
Did you enjoy your Thanksgiving? Did you try any new recipes this year?
Labels:
Autumn,
Our Home,
Tablescaping,
Thanksgiving
Tuesday, August 28, 2012
Drinks on the Patio
Its seems that lately everyone is starting to gear up for fall. Don't get me wrong, I love fall. It may be my favorite season. But I am not ready to do away with summer just yet! While I still grasp at the warm weather and sunshine, I'm going to share with you some patio projects this week!
It all started when my sister gave me a set of wine glass stakes, complete with a bottle holder. My sis, knowing the wino that I am, thought I'd make great use out of them. Stick a stake in the ground, to hold my wine glass, now thats awesomesauce. I was all excited to use them until I walked outside and realized, ah crap, we put a patio in last year! You cant stick a stake into brick!
That is when I started to get creative about how I could use these stakes. Quickly I realized that these stakes are freakin sweet, and I needed more of them. But they were also a little pricey. When I entertain on the patio, everyone must be able to put their wine glass in a cool stake because it really freaks drunk people out. "Dude! Why is your glass floating?!" Yep, that does not get old my friends. So this week in a series of posts, Im going to show you my projects which include, creating your own cheap-o wine stakes, beer holder stakes, and of course, a place to put them if you have a patio. You dont have to have a patio to take advantage of these great projects. A little spot of grass will do just fine. Afternoon picnic in the park? Perf!
So first up, here is my patio....
In this photo are some of the projects I'm going to show you this week!
This week you will learn how to make wine glass stakes, beer bottle (or can!) stakes, and drink stake stand.
Here's a close up if you needed it.
Lets get started with our first project, wine glass holder stakes!
Stop in your neighborhood hardware/home improvement store. I went over to Menards. They have a section with yard sale signs, and these are sign stakes. They cost 99 cents each! Yep, read that again folks, 99 cents!!! Grab a few of these stakes. Each one will hold one single wine glass. Oh! TIP! I highly recommend using plastic wine glasses. Nobody likes broken glass. Especially if it ends up in the bottom of your foot.
Now, take these bad boys home and bust out a good pair of pliers, or some kind of tool you can use to hold and bend the metal. You may work up a sweat, but its totally worth it.
You will start by bending the top loop. Make it so the loop is parallel to the ground.
Leave that second loop alone. Its handy for pushing your stake into the ground later.
Next, you'll want to pull the ring open. Just wide enough that the stem of your glass can pass through it easily. Its handy to have a glass nearby to see how far you need to stretch the ring open. The base of your glass will rest on the loop.
Stick that stake in the ground and slide your glass in! Viola!! You are done! Floating wine glass, there you go!! Now, pour your favorite bottle, and show off to all of your wino friends!!!
Stay tuned this week for more deets on how to satisfy your beer drinking friends!
**Note: I had to cut the length down on these stakes. They were a little tall for my stake holder. I took about 6-7 inches off the bottom. I would recommend testing it out before pouring wine and having it spill all over. Alcohol abuse is just not acceptable people!
Thursday, August 9, 2012
50 Shades of Fabulous
Every year I throw a garden party. I'm a novice gardener, but I like to show off what I manage to grow in my yard. This year, my girlfriends and I were all reading the 50 Shades of Grey books. I thought it would be really fun to create a dinner party with a 50 Shades theme, thus 50 Shades of Fabulous was born!
I set the table up in my backyard starting with a dip dyed ombre table cloth. I was dying for an excuse to try that project!
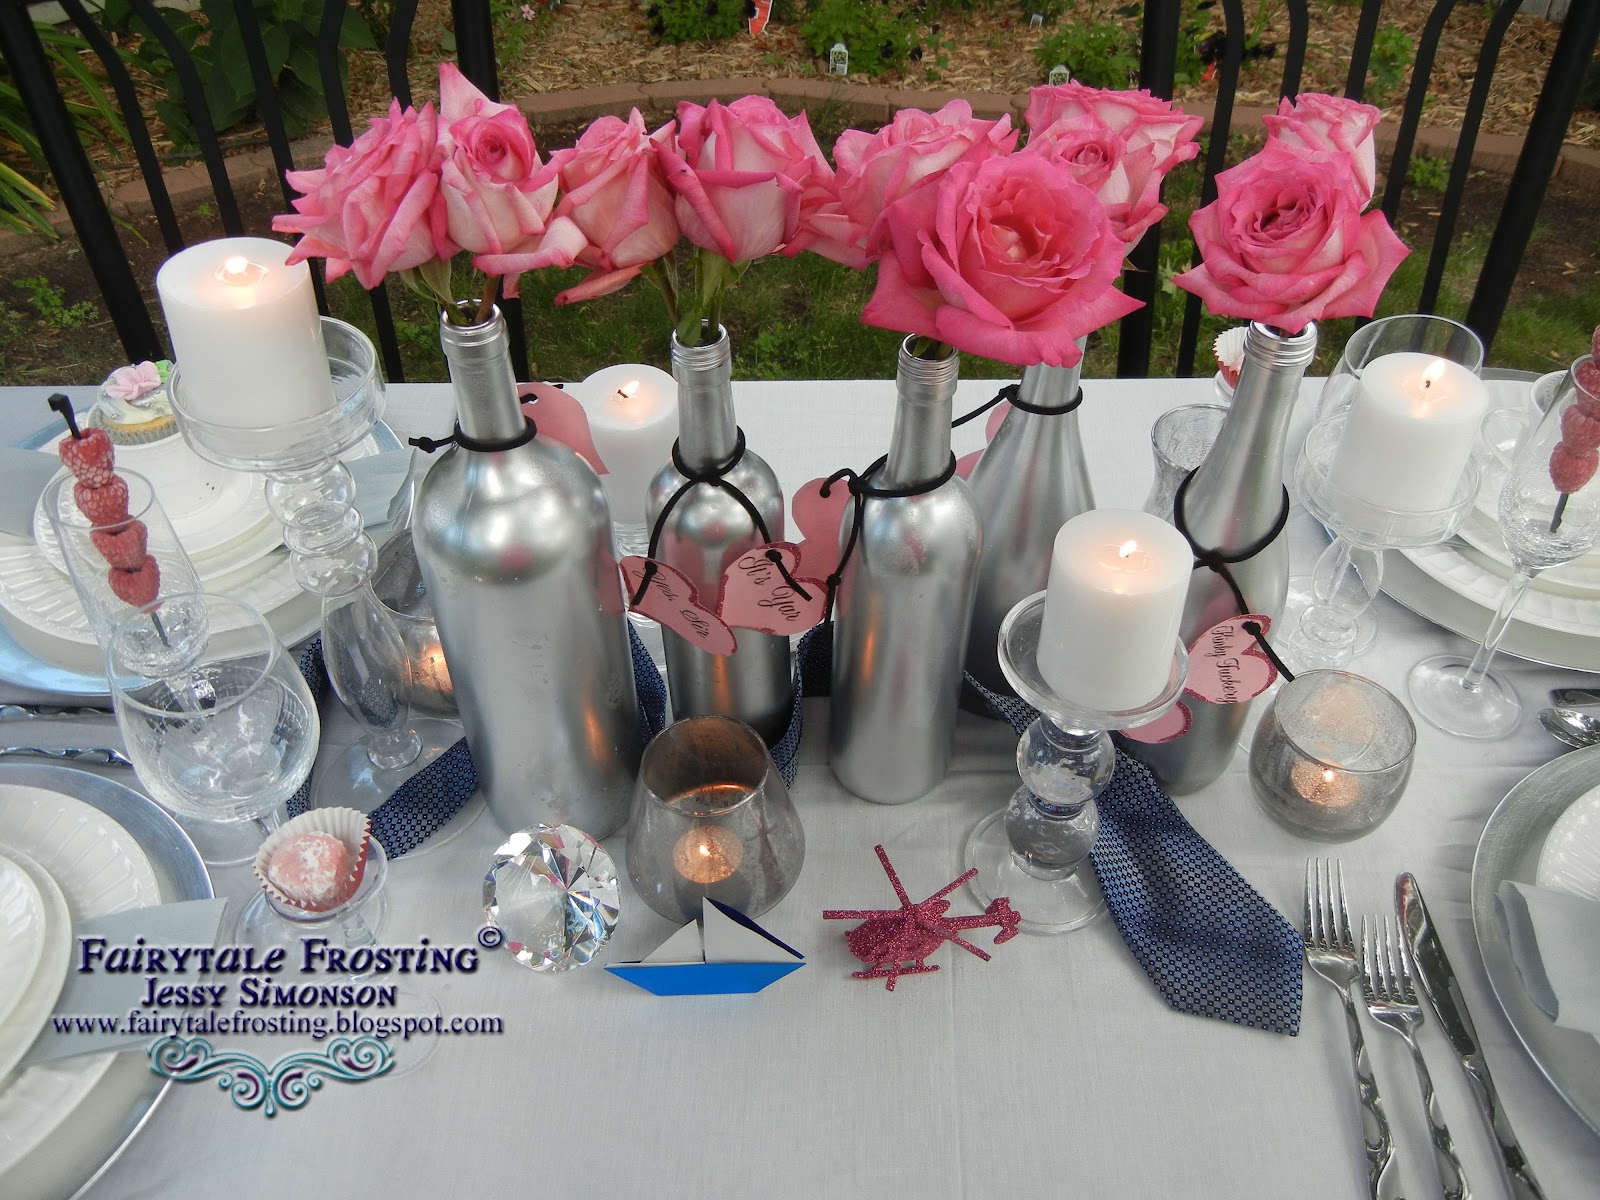
The centerpiece of the table was full of fun details from the book. I recycled some wine bottles by spray painting them silver and filling them with blush pink roses. The main female character Ana was known for always blushing. Some other details include the blue/gray tie weaved through the bottles, I folded an origami sailboat to represent The Grace, a glittered pink helicopter to represent Charlie Tango, and a big diamond!
On the other side of the centerpiece was a pair of handcuffs too!
The bottles were tied with leather ribbon and hung from it was glittered hearts with quotes from the books. Quotes like "Laters Baby" "Yes Sir" and a few others.
Christian and Ana were known to drink La Grande Annee Rose Bollinger Champagne. While I would have loved to have a real bottle of it, its a bit out of my price range. I also have a couple of signature party staples, one of which includes a glittered champagne bottle. I glittered up a bottle and included my own Bollinger label.
To keep our drinks from getting too warm outside, I froze raspberries onto zip ties!
Christian and Ana had a night where they drank Bollinger from tea cups, so I made sure to incorporate tea cups. What better way than to display cupcakes!
Another party staple I have is a rosette cake, so I made sure a sparkling silver one adorned our table!
Tuxedo strawberries were also part of the table, I mean, hey, Christian was described as looking amazing in a tux!
After dinner, drinks, and a bonfire, I also shared my other party staple....a photo booth! We had a few props, including some hand-made masks. There are too many goofy photos to share, but here is one to sum it all up.
It truly was 50 Shades of Fabulous!
Labels:
Dessert Buffets,
Garden,
Glitter,
Our Home,
Real Parties,
Summer,
Tablescaping
Monday, July 16, 2012
Wine Bottle Tiki Torches
You might not guess this from looking at me, but I'm a bit of a wine-o. A perfect night is hanging out on the patio with my girlfriends and a glass of wine. But, drinking wine means empty bottles and hanging out on the patio means mosquitoes, you know the Minnesota National Bird. When I saw a tutorial on Design Sponge for a wine bottle tiki torch I knew I had to try it. I mean really, it solves both problems! Repurposing used wine bottles and keeps away mosquitoes. However, I did end up having to modify some things just slightly, so I made a tutorial too. Check it out!
Supplies:
Wine Bottle (empty and cleaned)
3/8" Threaded Rod (This was sold in 3 foot lengths. I cut it into 4-5 inch lengths with a hacksaw)
2, Hex Nuts threaded for 3/8" rod
2, #10 x 1" Zinc Plated Wood Screws
3/4" Split Ring Hanger, threaded for a 3/8" rod
Top Plate Connector, threaded for 3/8" rod
1/2" x 3/8" Coupling
1/2" Cap (this is optional, but I recommend it)
1/2" Teflon Tape
Replacement Tiki Wick
Citronella Tiki Torch Fuel (not pictured)
Now you're thinking, what? Where the heck do I find all of this stuff?! I found it all in the plumbling section at Menards. All of it except the threaded rod, screws, hex nuts and tiki wicks. The threaded rod, screws and hex nuts were located in the hardware section. My Menards store didnt have tiki wicks, but I found them at Target in their seasonal outdoor section. Oh and the citronella fuel was located in the outdoors section at either Menards or Target.
It took me awhile to find the stuff at Menards. I'm not going to lie, having no prior plumbing experience or really any sort of construction experience, I looked like a lost puppy. But with a little patience and a lot of reading of signs on bins, I found what I needed....and felt like a rockstar! I've since made 4 more torches and now know exactly where to look for everything. It was pretty fun having my boyfriend along for a supply trip and he didnt know where to look for any of this so I got to show him. Ooooh yeah, victory is mine!
OK, now that you have your supplies together and your threaded rod cut into pieces, lets get your base set up.
Start by screwing your connector plate to your fence post (or other wood surface, where you intend to hang your torch---please be mindful that it is an open flame! Do not place your torch anywhere that could ignite surrounding things such as bushes, trees, etc)
1. Take your 2 wood screws and secure connector plate to post
2. Screw hex nuts to both ends of threaded rod. Move the screws closer to the center of rod so that we can attach the connector plate and ring to the ends.
3. Connect the rod to the already secured connector plate. Move the hex nut on that end all the way up to the connector plate.
4. Attached split ring hanger to the opposite end of the rod. Screw this in until the end of the rod is flush with the inside of the ring. Then, secure with the other hex nut.
Now lets prepare your bottle:
Begin by taking the coupler and teflon tape. The coupler is a bit small to fit inside your wine bottle, so you will need to wrap the base with teflon tape. You will wrap the thicker part of the base with the tape until it fits snuggly inside your bottle. This is what will hold the tiki wick in place. Just keep wrapping with tape, keeping the tape as flat as possible. After a few wraps, you can test it in the bottle. Keep wrapping until it fits snug and secure.
Once your coupler is properly wrapped you can pull it back out, thread the wick through and then put it back in. You can also fill it with citronella fuel before reinserting the wick. However, I waited until my bottle was securely hung before doing that.
Next, you will open the screws on the split ring, place your bottle in between the ring and then tighten the screws. BE CAREFUL not to tighten them too tight, you don't want to break the glass!! Just tighten each side until it holds the bottle securely.
**Note: the 3/4" split ring fits most wine bottles. It fit all of mine. However, you can always go up to a 1" split ring if you have a larger bottle, or a 1/2" split ring if you are using a smaller bottle.
At this point, I pulled out the wick again and used a funnel to pour in my citronella fuel. Then reinsert the wick.
When not using the torches, you will place the cap on the wick. DO NOT make the mistake I made...I pushed the cap down onto the wick, which them pushed the wick out of the coupler into the bottom of the bottle. I had to fish it out with a skewer, it was just a hot mess.
When you put the cap on make sure to just gently set it on top of the wick. The cap is optional, but I recommend using it to help keep your wick dry from dew and rain when you arent burning it.
One last tip, I do also recommend letting your wick sit in the oil, in the bottle, before you start to burn it. In other words, I know you are excited that you just hung up your torch, but wait about 10 minutes and then marvel in your awesomeness.
That's all there is to it! Enjoy!
Tuesday, April 17, 2012
Fairytale Direction Sign
I am so excited to share this project! We are having an unseasonably warm spring in Minnesota, so I have been anxious to get out in my yard. Its still to early to do much in terms of planting, so I got started on some yard art. I fell in love with this pin:
(This pin's source isnt accurate. I've tried to find the original source without success. If you know it please message me.)
I have a small corner of my yard that could really use some landscape help this year. I decided to recreate this idea for my yard. (Don't mind the plants around it, I'm working on that later in the season!)
To make this sign, I first chose the names/locations from my favorite books, movies, and real life places. I figured out how many signs I wanted on the post. Fortunately we had lots of random pieces of wood in our garage from other projects. I gave everything a coat of white exterior paint. I searched online for free fonts that matched the places I picked. I adjusted the font sizes as necessary, printed them in the reversed mirror image so it would read correctly when I transferred it. I placed each name ink side down and I used rubbing alcohol to transfer the text onto each board. I just dabbed it on with a cotton ball. Carefully peeling the paper away you will have a light transfer of the text. Enough to paint over with black paint. I used acrylic craft paint. I gave it a quick coat of sealant before constructing it all.
Do you know where all the places are from?
The Great Valley: The Land Before Time, a childhood favorite movie for my family
Edinburgh: Scotland. I studied in a nearby town during college. Edinburgh is one of my most favorite places on the entire planet.
Hogwarts: Harry Potter....fan of the books and movies. My sister and I went to the midnight release for a few of the books and all of the movies.
Narnia: The Chronicles of Narnia, another childhood favorite that I loved even more when I read them again as adult. I also loved the movies that have come out so far!
The Ivory Tower: The Neverending Story, probably my most favorite childhood movie. Bastian had to try and make it to the Ivory Tower to save all of Fantasia.
The Shire: Lord of the Rings, books I actually red while studying in Scotland, so its duly sentimental.
Diagon Alley: Again, Harry Potter
Emerald City: Wizard of Oz, my goal is to get shoes just like Dorothy's!
District 12: The Hunger Games, my new love
Rivendell: Another Lord of the Rings reference. This was actually more my favorite place in the movies. It was beautifully portrayed.
Magic Kingdom: I have been to Disney World too many times to count. It is another one of my most favorite places in the world.
Thursday, April 5, 2012
Suspended Mason Jar Herb Planters
I love cooking with fresh herbs, especially basil. I use a lot of basil. I love how it makes my kitchen smell, I love the flavor, and I love the bright green color. Since I live in Minnesota and its not exactly warm year round, I wanted to find a way to bring fresh basil into my kitchen. However, I also have a really small kitchen. I don't have the space for a counter top herb garden. So I came up with this idea instead!
I filled mason jars first with some gravel and sand, then potting soil and I split a fresh basil plant in two. The jars are suspended by hose clamps. The hose clamps are connected to the cabinets by a metal plate and screws.
Now I can have fresh basil whenever I'd like! I may even add a couple more jars with different herbs too.Monday, April 2, 2012
Makeup Organization Ideas
Spring has finally arrived! That also means its time for spring cleaning. One of the many organization projects I have on my list is to get my makeup under control. I do not wear much makeup. Mostly eye makeup and lipstick/gloss. Somehow my "minimal" approach to makeup still dominated my bathroom. I decided it was time to purge. I got rid of a lot of shadows and liners that are old and I'll probably never wear again. I sorted my makeup into categories of everyday wear and special occasion wear. The special occasion (a.k.a. makeup in crazy colors that I can only pull off at night, on the town with the girls) was neatly put away in a case in the closet. Then I was left with my everyday wear. It was not enough to make it worthwhile to put in a big bulk case, but not small enough to just leave out. I decided to try magnets!
I glued magnets to the backs of all of my shadows and....
Viola! Now all my everyday shadows are on the inside of my medicine cabinet! Off the counter, out of the way. I love it and so does my boyfriend who is cursed to a life of sharing a bathroom with a girl.
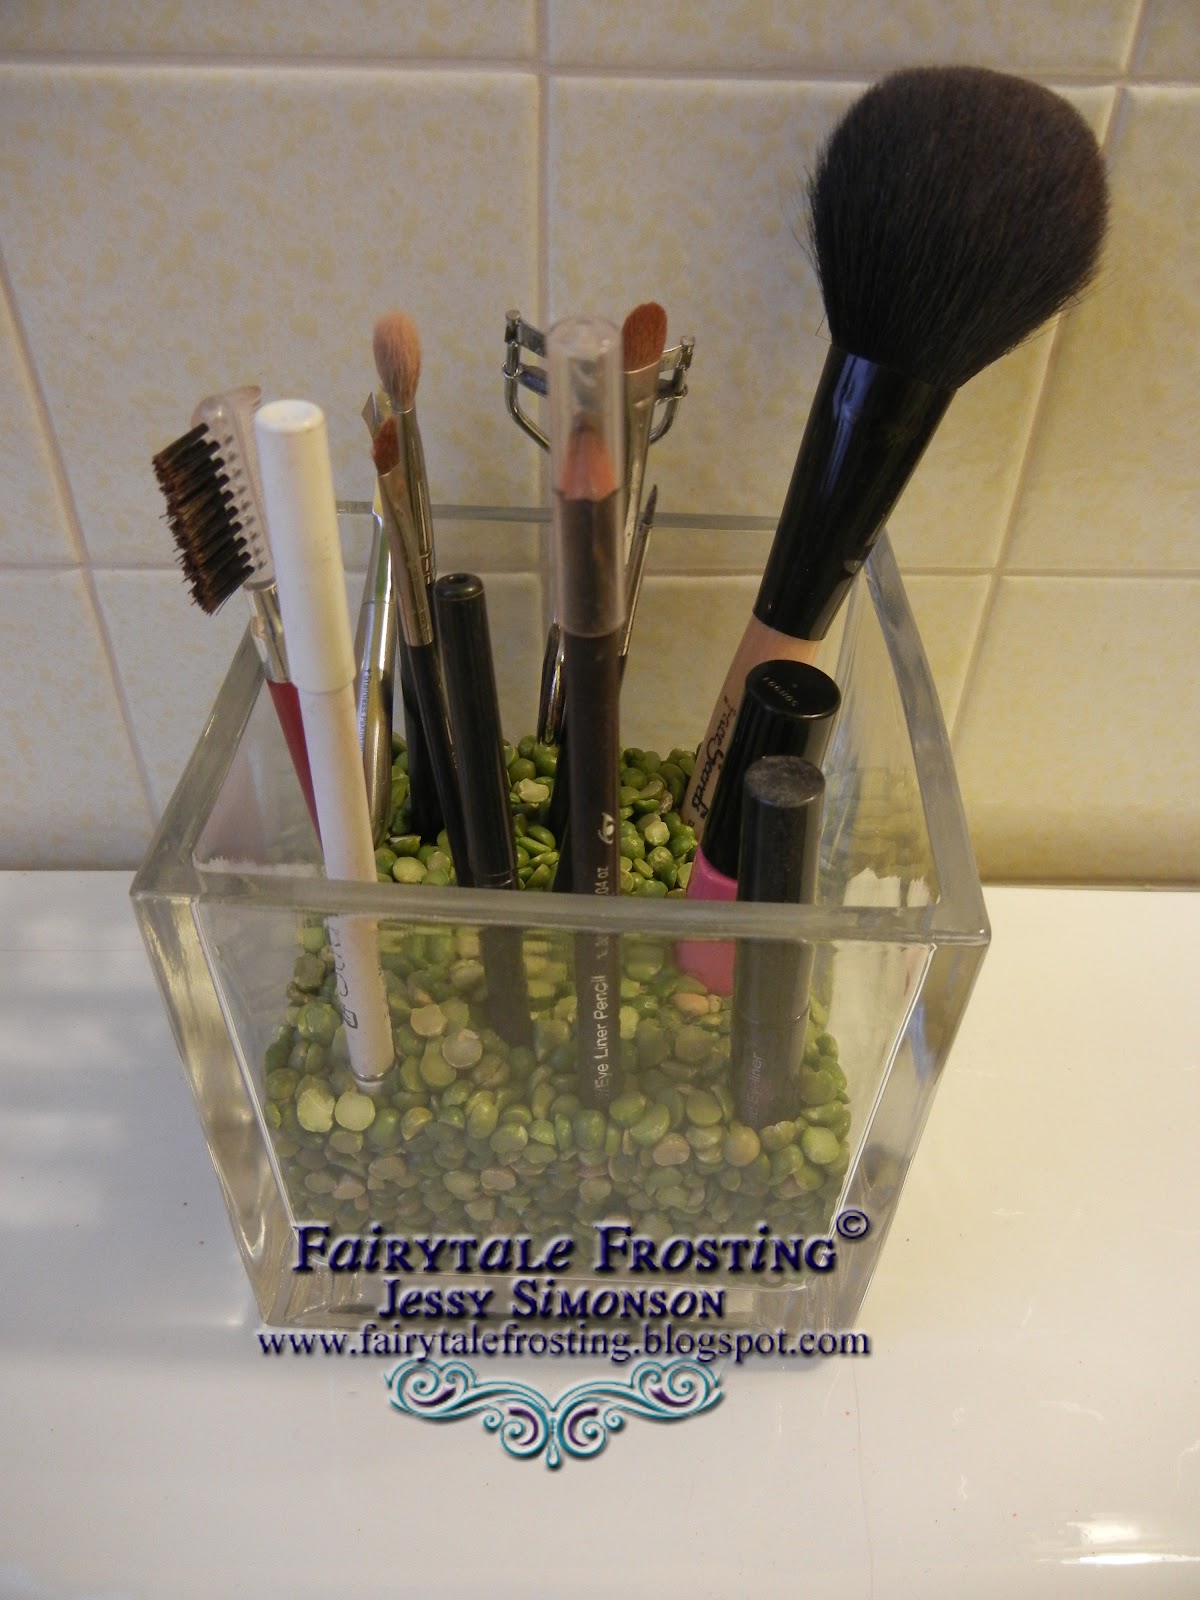
Now there was of course the pesky question of what to do with my brushes, liners and mascara. So I headed over to Michael's with my handy 40% off coupon and picked up a square vase. Then I stopped at the grocery store and picked up a 99 cent bag of split peas....
Taaaa Daaa!! Organized brushes and liners! Now everything is in plain view...no more digging around in my bottomless pit of a makeup bag.
It all looks so nice and neat that even my boyfriend thought makeup organization was cool.
Subscribe to:
Posts (Atom)